Showing posts with label radio. Show all posts

Monday, 2 January 2012

Back to Blog!


You may have wondered where I've been (or maybe not!) Between having problems logging into blogger and all the craziness of the Xmas season of making enough glass for the stall I've barely been on line for ages.
I really don't know where the last few months have gone, the workshop is in more than a mess than usual. I didn't expect December to be quite so crazy, which I am more than grateful for as I expect January to a quiet and lean month. I normally get through one 6kg gas bottle in a month, I got through two and the remains of a third in one month!
However I am taking the time to give myself a little rest, and catch up on some neglected projects. One of this is a Steampunk radio project, of which I finally got around to putting together. (If you check back through the blog there is mentions of the brass plate and the long valve over a year ago!)
It's pretty much done, expect for the internal lights which will shine up through holes underneath the valves to make them glow. I'll make a video when I get that done, as I also have some circuitry that will make the lights flash and pulse.
I wanted to make as many of the parts myself, and not just 'spray it brass and stick cogs all over it' - Steampunk should be so much more than that! That's probably a rant for another time, but I did use just three parts from watches. Two are the brass end caps on the horizontal red/green valve, I think they are the cases from watch springs. The third one is the tiny silver cap on the blue/green valve which is actually a winding knob. Apart from the switches, which will work the circuits, I made everything else.
The wood case is actually scraps of skirting board, the brass plate was in the off-cuts at my local model making shop, which I added a fancy paint effect to. All the little brass & copper rivets I made from tubing offcuts - bead makers will know the Impress bead liner, which usually adds silver cores to charm bracelet beads, and makes rather fun custom shapes for the valves! Add in a few bits of copper wire, lacquer, and two sturdy brass chandelier couplers, and it's nearly done!
I must admit it's not exactly how I'd orginally planned it, some bits I didn't use at the last moment, and added ones I didn't expect to, but I'm quite pleased with how it's come out. I already have another one in mind, which is going to take a bit more research, and will be mostly clear glass, and hopefully quite a size!

Thursday, 1 September 2011

New Work Space


Excuse the lack of blog update for the past few weeks, but
I've been moving! No, not house, but workshop.


I hadn't realised how little space I've been working in,
until I wanted to find somewhere for the new kiln, and find somewhere to spread
out the parts for some Steampunk sculptures. Until now the only spare space has
been the top of the kiln, not really an ideal workspace! It was actually on
suggestion from "the other 'alf" who felt that as I was working in
there 24/7 it only made sense I took over the spare bedroom/study which was
being used more for storage than any work! She also rather fancied this smaller
room as her office too. A quick advert in the local paper and the sofa bed was
gone, and then the grand move around could begin.


It's still work in progress, I've spread out a bit but I
still realise there isn't quite as much room as I thought, but I have managed
to put in a massive 6x3ft table to work on, in addition to the lampworking
bench! My old room is finally getting a makeover and decorate, and is already
filling up with books that until now have been spread around the house.

I've been able to drag out some old bits of treasured
electronic 'tat' too, including my Denko 1946/7 shortwave valve radio. It's an
amazing radio, I snapped it up years ago for £5.10 when I was still at college;
it really should have cost a lot more, however I got it in an auction and the
guy I was bidding against seemed to have got distracted and didn't realise he'd
been outbid by 10p! I remember listening to radio Australia
in the mornings between 8 and 9.30am
before the signal faded as the sun interference increased and the signal faded
out.


One thing I haven't set up yet is a photographic corner, so
still no new listings yet, but I've been working like mad so it shouldn't be
too long before I can start refilling my Etsy shop. I have been playing with
the new kiln, and have managed to try out a few kiln casts.

Its quite exciting
and nerve racking to do, I feel like I've got lots to learn, but have managed
to make a few nice casts already. I will hopefully add a new dimension and
styles of glass to add to what I already make, there will be much more about
this to come!


Tuesday, 28 June 2011

Decorative brass effects & Steampunk Radio sculpture revisited


A few months ago I posted a picture of a brass plate I was working on, which then got put back on the back-burner once again. Pulling it out a few weeks ago when I had five minutes spare I realised I'd made a daft mistake. I'd forgotten to put a sealing layer over the initial brass before putting on the decorative paint coat. The masking I'd used to make the pattern had left some glue and grot, when I tried removing it it had only made things worse. Doubtless some people would say it adds character, but I know it's there and shouldn't be!

It's taken me a while to decide to start a fresh, hopefully learning from my mistakes along the way - but then isn't that what arts and crafts is about? Here is a picture of the new bright and shiny brass plate.
To make this brushed brass finish is actually quite easy and takes no time at all. If you pop down to Maplin's or an electronics stockist you can buy a rubberised polishing block which is normally used for degreasing and cleaning the copper on PCB's (printed circuit boards for the non-technical) prior to etching them or soldering components onto them. Their part number is HX04E http://www.maplin.co.uk/polishing-block-2109 if you want one too! It works really well on many soft metals such as copper and brass, and lasts for years if looked after, although mine looks a little grubby from the dirt I took off this apparently clean brass sheet!

To get a good finish it's just a matter of polishing in one direction, then the other, and back again a few times until you get the finish you like. Just make sure you keep it flat against the brass as you do, and go in nice long and even strokes.
It's no good for really deep scratches, but will certainly buff up most boring bit of brass and copper. To help hold it use some double sided sticky take to fix to a bit of scrap card; saves those finger marks on the edge! (Neat trick I got from an instrument maker!) Brush off the remaining dust with a soft cloth, and lacquer or spray varnish to protect that finish.

If you are feeling really fancy, after you've got a nice finish with the brushing marks going one way, using just the corner of the block make some figure of eights over the surface to produce a unique decorative look. If you don't like how it looks, just polish again to remove it!

I'll try and post some more pictures as this comes along, and also explain what I'm going to do with the bag of cogs and this odd little (and surprisingly expensive) little metal gadget too.

Wednesday, 5 January 2011

The Plague!


My plans to get stuck into lots of projects over the Xmas break really didn't go to plan. Just before Xmas we were wiped out with the flu/cold bug that was going around this year, and still haven't really got over them even now. It did rather put a damper on the festivities too, as we didn't go anywhere but alternated between lying on the sofa or bed! We got in a few treats to nibble on, but a lot of the nice rich food has gone to waste as chicken soup was about as much as we could manage. Unfortunately it seemed to go to my chest, and next trip to the bottle bank won't see me taking lots of post new-years champagne and beer bottles but cough mixture bottles!!!

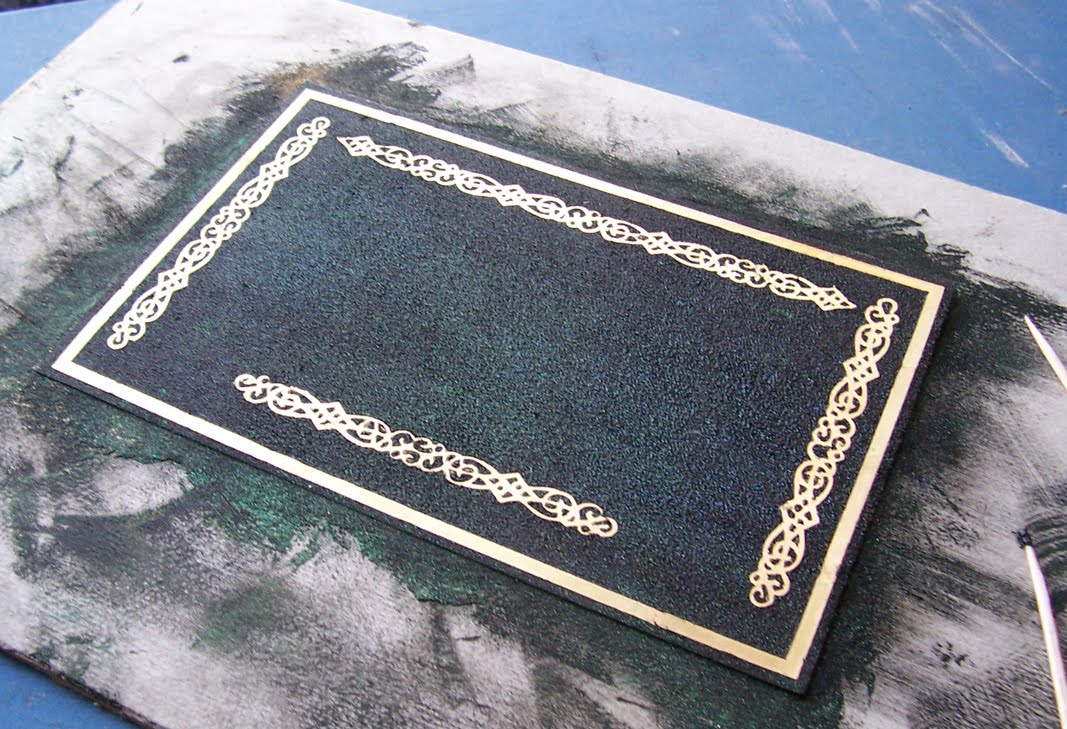
This has put a delay on working on the shaver handles and big-holed silver cored beads that I wanted to have ready in the new year. I did manage to get this little bit done on my Steampunk radio project before I got too wiped out. The paint effect on the brass plate has been drying for about two weeks, and needed a little bit of touching up where I took the masking away, but it's looking quite good. I originally was going to have it flat, but couldn't remember how I did that so went for this stippled texture which I think makes it stand out a bit more. There is green and blue in there to give a slight peacock iridescent effect.

The box will need a few more coats and rubdowns to get it right. I am using ruby shellac varnish, which I mix up myself. It needs gently rubbing in with a cloth, followed by rubbing back, then re-applying. The more layers I can add the better to give that feeling of age and depth. I need to leave the plate at least another week now for the touch ups to dry, so it'll give me time to keep adding layers before I start assembling it. I am not sure I am yet up to sitting over a hot torch with large lump of hot glass to make shaver handles so I think the next job will be the silver cored beads. I've got some test beads made, so now I need to anneal then core them, then hopefully I might be up to getting back to glass!