Showing posts with label lampwork. Show all posts

Thursday, 11 July 2013

New Toy & Green Man/Woman Sculpture

It's been a bit of catch up since the last Expo and class, mostly I've been getting my head down and making new pendants and marbles for the stall. Hopefully they'll be some new marbles trickling through into my Etsy shop again in the next few weeks as well.

However I still want to try and make time to keep practising and improving my sculptural techniques. For a while I've quite fancied a hand torch, something that can go to really fine pin-point flame to tweak and work on details. Of course I couldn't quite justify the expense, it's not just the torch but all the new pipes and connectors too, plus I couldn't decide which one would be best for me. After chatting about hand torches during the course, and then seeing a cool photo of an American artist standing before a three foot sculpture he was assembling with a hand torch, I looked a little harder and came up with a Smiths Mini Torch at a bargain price.

New Little Torch
Although really made for metal work, it's quite popular with some glass artists. Although the flame really is tiny, it's nice and compact, has a tight hot flame, and best of all comes with it's own light and small hoses already attached. The hoses were the clincher, not only did it save an extra expense of new hoses, I didn't fancy having to hold a torch being dragged down by the normal heavy propane hoses.

Work in Progress, glass leaves being added using a plaster former
It's taken a few weeks now before I've had time to play with it though, apart from playing catch up I'm just confirming a very large commission which will keep me busy for weeks (holding breath and touching wood that it comes off, more on that when it's all confirmed!) However there has been an idea that's been kicking around in my head for a while, and this seemed the ideal tool for the job!

These are some 'work in progress' pictures, of a Green Woman mask that I've been making using the little torch to assemble the leaves which I made using my Lynx torch.
Top view of the mask removed from the former, with a leaf beside it

Off the former, this needs to be annealed before I carry on. One of the 'blank' leaves loose beside it
Little torch with it's tiny flame next to my Lynx running a fairy small flame

Before starting on this I've been wondering how to put the leaves together to make a good 3D shape. I figured a former would be the way to go, but I certainly couldn't afford a custom graphite shape in this size. Bellow is a quick run down on how I put this together, using plaster and mod-roc (basically bandages impregnated with plaster-of-paris, which many model shops stock for making hills and mountains on train sets etc.) For the mould I used the packaging from a paint your own mask kit from my local 99p shop! I was going to use the mask, but the plastic blister pack it came in was ideal as I didn't have to plug up the eyes and mouth cut outs, and it was waterproof!

Mask mould, I left the mask underneath to add some support and strength to the mould
This is my first real go with the torch, and it's quite a liberating way of working, although I could really do with a safe stand where I can leave it when lit if I need both hands free. It's a bit temperamental to light and keep lit until the gases have settled down. I found that I can even use a thin stringer to help 'weld' or 'solder' two parts together, and that if I get really close it's fierce enough to even 'push' the glass. I certainly need a bit more practise with it, maybe once I get time to finish this mask off I'll have a go at another once, with coloured leaves this time. It certainly opens up some interesting ideas and new ways of working.


Bellow is a quick run down of how I made the plaster blank, for anyone who wants to try something similar. Do use the torch on this at your own risk though, this is an experimental technique, and the plaster and modroc WILL get burnt as you work!
 
First layer, I used plaster and quartz (equal parts) which is a formula usually used for making kiln casting moulds. I hoped it would provide better heat tolerance for the 'working area' of the cast

Mod-roc, cut into strips and rough squares. Just pass this through a tray of water to moisten and then slap it on!
After adding some more plaster I started building up the sides with modroc and re-enforcing the main part of the cast with the modroc


Add more plaster before the last has set in the hope it all sticks together well!


Alternating now with layers of plaster and modroc, this adds both lightness and some structural strength


It's really easy to smooth out the modroc with a fingertip, be careful not to get it too damp though

Top up to the top, and smooth over so it will lie flat when de-moulded. It's a working cast and this bit isn't going to be seen so no need to make too much of a fuss of neatness.


Broken chin! I made the quartz/plaster layer a bit too thin, and then didn't push the modroc down enough so had a void under the chin which then flaked off. You learn by mistakes!
The finished cast. Now leave to dry, I left this near (but not on) my kiln for about two weeks to make sure it was fully dried.


Monday, 14 January 2013

Sawdust January


Well, as expected, January hasn't gone quite to plan, but then I never really expected it to! The original plan was, tidy and sort out the work-spaces, make lots of stuff, work on some new experimental stuff, and do lots with the huge glass order I placed two weeks before Xmas.
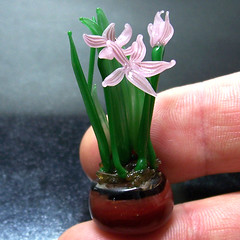
I've managed to find time to make a few new marbles too!

The one big hold at the moment is a big order of coloured borosilicate glass, which left the USA warehouse on the 12th January. By 14th it had got to 'forwarded to exporter,' where it seemed to remain until 2nd, when on-line tracking said 'arrived in UK.' I finally heard today, on month later, it might have actually got through customs and just requires me to pay up for tax and duty before I can git my mitts on it!

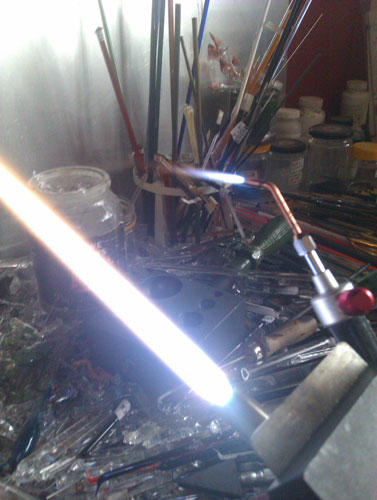
In the meantime I have got some small degree of organisation going in the workshop. First on the list was the ever expanding quantity of jars containing frit and powder. I have quite alot of old baby food jars with special lids for plant micro-propagation (long story!)  These are ideal as they are designed to be removed with one hand, so I can easily pop the lid off one that I need to use whilst the other hand is holding a rod of hot glass ready.
Before

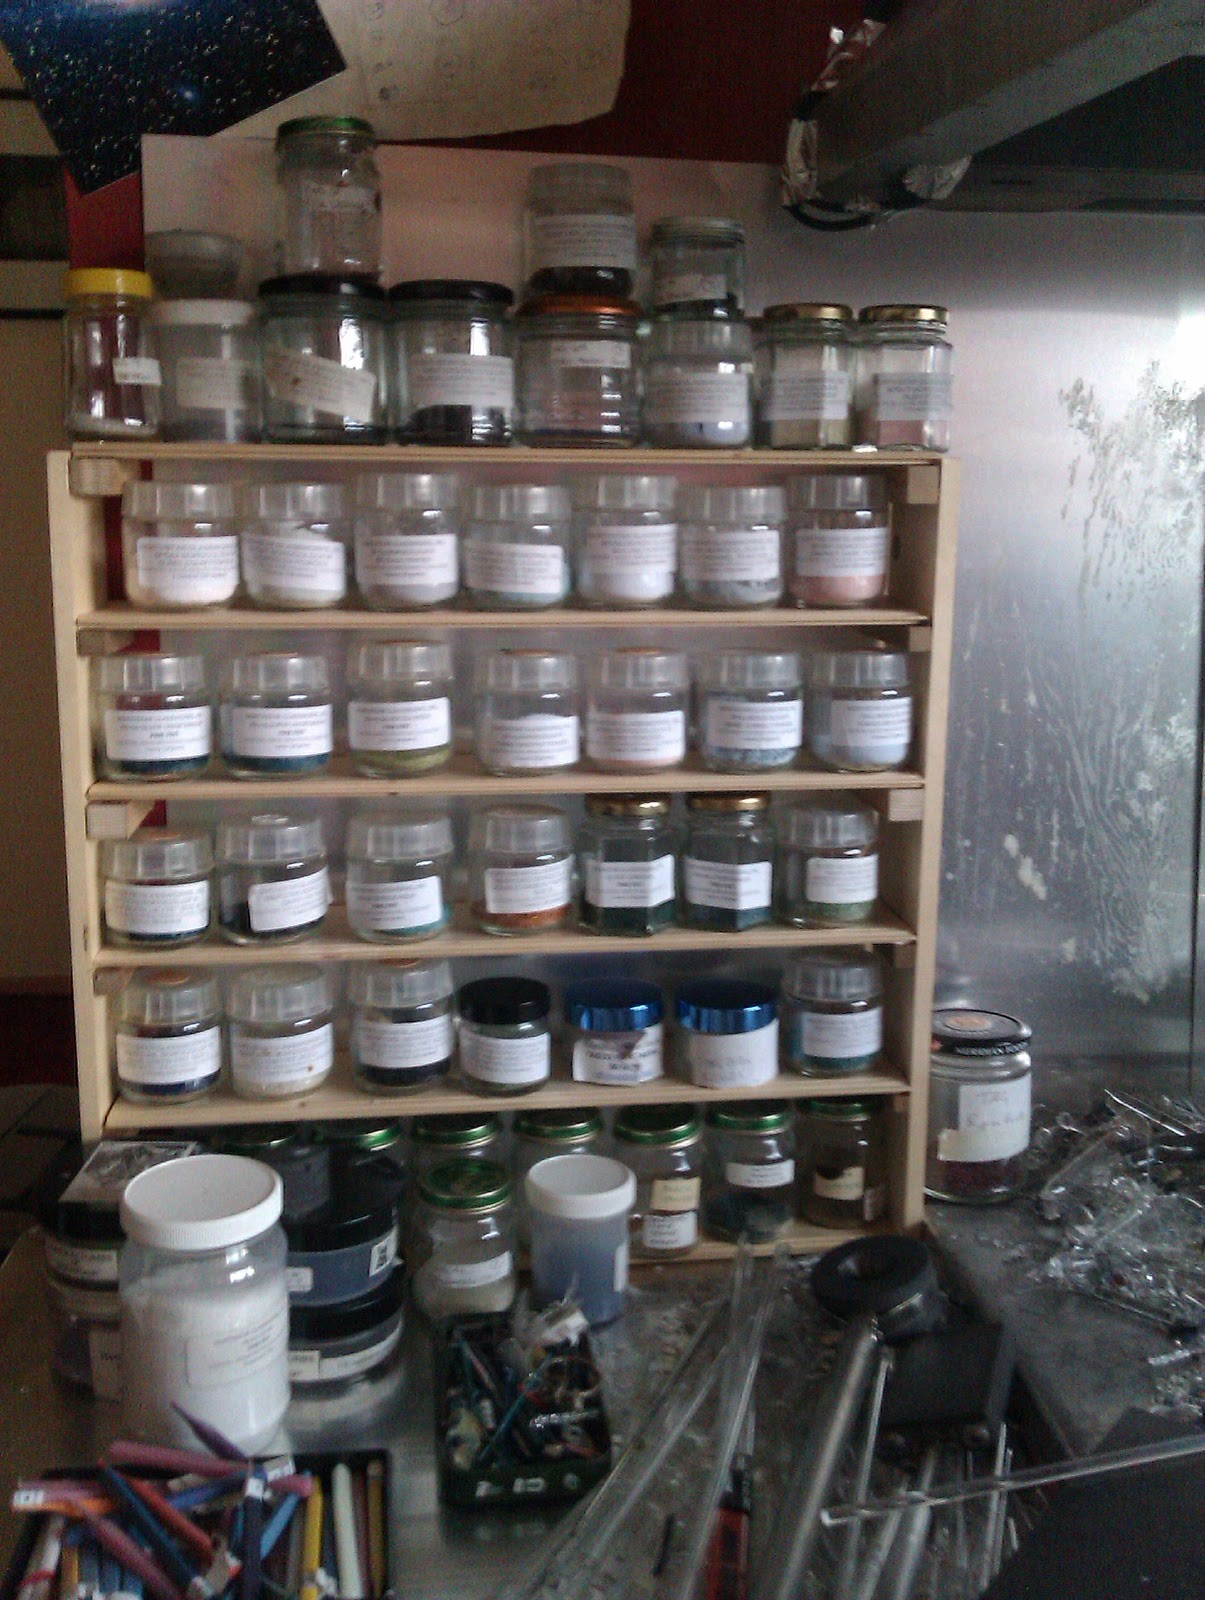
What I obviously needed was some kind of spice rack. I'd previously tried a 'lazy Susan' rotating stand to hold them, but it just seemed to take up too much desk room. The result isn't very neat or well made, but it does the job! The before and after photos show how much tidier it looks already!

I didn't realise how much frit I'd acquired, some of them only have a little left, so I'll use those up and start transferring over to all having the same jars. Luckly the commercial small 4oz Northstar jars are about the same height too, as I know I'm going to end up with some more of those too!

After
The slightly bigger job was to sort out rod storage for the incoming 26lb box of glass (yes, I went a little crazy with the ordering, but I figured it would keep me going for quite a while.)  It also became a bigger job as the table that it was going to go under had a strengthening bar that was in the way. In the end I replaced the table completely, it was quite old and rickety. A pack of 40mm plastic pipe chopped up into lengths has made a nice neat 60 storage holes, but I've left space above as I'd like to extend this later on. I probably should have gone for slightly wider tubing, some of the colours may have to take up 2 slots for now, but the 50mm came in dull grey rather than white. At the bottom I've left wider sections to keep the more bulky supplies of tubing.

Apart from this the other major January job has been to get the dust off my Etsy shop. If you check my Facebook page regularly you may have noticed I've gone listing crazy, as I try to get lots of variety and a range of items back into my Etsy shop. I've been aware for a while now how little I manage to list, Greenwich seems to have taken up an awful lot of time and energy this past year, so I'm taking a few weekends off over the quieter months to try and catch myself up in advance - if that makes sense!

Monday, 2 January 2012

Back to Blog!


You may have wondered where I've been (or maybe not!) Between having problems logging into blogger and all the craziness of the Xmas season of making enough glass for the stall I've barely been on line for ages.
I really don't know where the last few months have gone, the workshop is in more than a mess than usual. I didn't expect December to be quite so crazy, which I am more than grateful for as I expect January to a quiet and lean month. I normally get through one 6kg gas bottle in a month, I got through two and the remains of a third in one month!
However I am taking the time to give myself a little rest, and catch up on some neglected projects. One of this is a Steampunk radio project, of which I finally got around to putting together. (If you check back through the blog there is mentions of the brass plate and the long valve over a year ago!)
It's pretty much done, expect for the internal lights which will shine up through holes underneath the valves to make them glow. I'll make a video when I get that done, as I also have some circuitry that will make the lights flash and pulse.
I wanted to make as many of the parts myself, and not just 'spray it brass and stick cogs all over it' - Steampunk should be so much more than that! That's probably a rant for another time, but I did use just three parts from watches. Two are the brass end caps on the horizontal red/green valve, I think they are the cases from watch springs. The third one is the tiny silver cap on the blue/green valve which is actually a winding knob. Apart from the switches, which will work the circuits, I made everything else.
The wood case is actually scraps of skirting board, the brass plate was in the off-cuts at my local model making shop, which I added a fancy paint effect to. All the little brass & copper rivets I made from tubing offcuts - bead makers will know the Impress bead liner, which usually adds silver cores to charm bracelet beads, and makes rather fun custom shapes for the valves! Add in a few bits of copper wire, lacquer, and two sturdy brass chandelier couplers, and it's nearly done!
I must admit it's not exactly how I'd orginally planned it, some bits I didn't use at the last moment, and added ones I didn't expect to, but I'm quite pleased with how it's come out. I already have another one in mind, which is going to take a bit more research, and will be mostly clear glass, and hopefully quite a size!

Tuesday, 28 September 2010

And The Answer is.....


Thank you to everyone who had a go at guessing what strange glass items I was making last week. The answer was..... Dog Whistles!

Set just above the range of human hearing but they can be heard by dogs (and cats, but they are above being summoned by a whistle!) these whistles can be used as a training aid. The metal is gold plated, giving it that bright brass look without having to polish! At the other end is a link which can be attached to a keyring, bag, belt, or hung around the neck on a cord. I have made a hollow borosilicate glass centre with lots of colour to make it more eye-catching.

I imaged them straightaway as being an ideal addition to a Steampunk utility belt or purse. As Steampunks are likely to get into many scrapes and adventures, I can see this being quite useful; whether it's crash landing an airship in the Artic and needing to get the attention of a passing huskies train, or distracting werewolves in the back streets of London, I am sure this will do the job while adding a touch of extra style to any outfit!

Thursday, 23 September 2010

Marble Video


One of my most asked about items is the flower marbles I make. Maybe because I know how they are made I don't really think about it, so I was surprised when people asked me questions which I thought odd, like 'do I buy them and put glass around them?' I even had some people asking if they are real flowers inside! Initially I was surprised at that one, the idea of putting molten glass over real flowers! Toasty! Then I realised what a compliment that was, that I'm getting them more life like!

I figured the best way was to show how it's done. The problem with that is one of these can take me 35-45 minutes, depending on how well it works and how complex they are. I decided time lapse was the best way, so I speeded up the action three times to make this little 12minute video.

My camera memory is a bit limited, so I had to cut making the coloured glass cane that makes the stripy flowers, and the first ten minutes. Also it has a bit of a tint as I put a spare pair of safety glasses in the front to remove the sodium flares the glass produces - a previous attempt was just lots of bright yellow glows!

I hope you enjoy it, I just wish I could work so fast normally!

Monday, 20 September 2010

SteamPunk Saturday & Competiton


It feels like ages since I've been at the torch, what with so many events and things going on. One thing I've been wanting to do is make more Steampunk inspired stuff, but I seem to be easily distracted by pretty shiny new glass and techniques to try out.

I'm trying to make a conscious effort not to do 'sticking cogs on stuff.' I'm not saying there is anything wrong with 'sticking cogs on stuff,' but the genre is more than cogs. I guess it's part of the genre becoming more known, and thus more commercial, and cogs and gears are quite iconic. There is a whole other host of motifs that have yet to be explored. Also, making cogs out of glass is difficult. I know, I've tried.

One very common yet now seldom seen Edwardian design was faux marbling. You still see it on old books, and was done by floating oil based inks on water, making pretty swirls in it, then passing the paper under the water then up to 'stick' the colour on. Faking marble with paint on decor is even older, I have a copy of a 1600's book on how Paper Mache and wood was made to look like tortoiseshell and marble.
When I started making the razors (some exciting news about them coming very soon!) the first comment my 'other half' said was the effect reminded her of a tortoiseshell. Since those early ones the handles became more colourful, and now they remind me more of these old marbling effects. The name 'Steampunk Tortoiseshell' seemed to have stuck though!

I am also too practical for my own good, and even when I try to make Steampunk stuff often they don't get finished unless they 'do something!' This weekend I've been marrying up my 'Steampunk Tortoiseshell' glass with some brass parts (no cogs!) to produce something that does something, and is also wearable. Whether that 'something' is useful is another thing altogether! I'll announce what it is in a few days time when I start listing 'it' in my Etsy shop. However if you'd like to leave a comment with a guess the first one to get it right I'll send a free handmade marble to! No limit to the amount of guesses, and as an extra clue this device is unisex, and can easily be held in one hand. I can't wait to see your guesses!

Tuesday, 24 August 2010

The Value of The Dry Run


One of the limitations on doing fairs for me is that I can't drive. In all these years I just never got around to learning. Living for so many years in London didn't help, as it's easier there to hop on a bus, tube or train than sit in a jam too. I figured whatever I would have spent running a car I'd spend on tube and occasional Taxi fares.

It does make getting to fairs tricky, especially if I want to take plenty of stuff with me. For the upcoming Dark Mills festival I wanted to improve my stall layout, a lot of other crafters have mentioned adding height to their stalls too. If I was a car driver no doubt I'd invest in some nice glass display units, but I had to come up with something light I could flat-pack.

My solution is this simple stand which is designed to take the new boxes I am now using. It starts as two thin planks, two flat panels, and a bundle of wooden dowels. Four bolts lock the corners together, which isn't that strong until all the dowels are pushed into place, then the whole box becomes much more rigid. The jewellery boxes are then laid onto the dowels which holds them up at a nice angle, with two holding the back and another acts as a register to support the bottom edge - the new boxes even have a lip which helps with this. When I first tested it out I found I could fit 60 of the large sized boxes in this, on a table space I'd originally have got less than half that onto. They look pretty good too, as each pendant is framed by the white foam they are on. Also the inside area will act as a neat storage area for lids and spare stock - much better than a suitcase on the floor which is what I used before for storage!

I set up a dry run of this in my living room, which turned out to be invaluable. Since first making it I'd added runners so I could slip a black card down to hide the storage area, but they now stopped me getting the bolts on! Plus the paint now clogged up the holes so the dowels now didn't fit! So glad I found that out when I could rush to my shed for tools rather than at 7am on site! Once that was done I tried laying out the other side of the table with the busts and new bottle stopper display (a funky new acrylic holder I've made too.) It took a while of moving bits around, but got it looking 'ok,' but it wasn't quite right still. As this was a dry run it meant I could leave it and come back to it, and move things around at leisure. That was invaluable as it took just moving one thing to go 'ah ha!' Not only had I got a layout I liked, but realised that I could use one of the busts to fill in space when (thinking positively here!) the ribbon necklaces sell out! I just need to make a device to hold the little world stud boxes next.

One of the extra things I realised from the test setup was the digital picture frame looked lost, and took up valuable space on the free side of the stall. I picked it up and lent it on the main stand meaning to shuffle things around, and suddenly saw that was actually the best place for it! Out with the drill, a few extra mounting holes (stab myself with a stanley knife, typical!) and it's now at eye-level! I just hope the rechargeable batteries last all day!

Now as it gets nearer the time I am starting to get nervous, I've spent a lot on bits for the stall so I really hope it does well! At least with this dry run out of the way I now know how the stall will look and have got some daft problems resolved in advance. Fingers crossed the weather stays fine now!

Friday, 20 August 2010

Unobtainium and Jellyfishes


Having a few more hours in the day has allowed me to get a little extra time to try some more difficult materials and techniques. One of these has been to play with an unusual glass called 'Unobtainium!' This has a fabulous pearlised/metallic blue finish, but it's not without its problems.

Although it's been around before the film 'Avatar' I think most people know the name from that film (I know fellow geeks will also remember in 'The Core' it's what their ship was made of too) and according to Wikipedia it's any mythical material that can't be made. It does look like it's not glass, looking more like metal with it's sparkling shine, so I guess that's why Northstar gave it this name.

One downside of it is that it does have alot of metals in it, which sometimes can cause compatibility problems., and they recommend not deeply encasing it. Of course that's the first thing I did! I've played with it a few times, but this week I wanted to really give it a hard test to see if it really was that temperamental, I'd certainly had it cause cracking before. I did everything wrong, used loads of it, deeply encased it, let it cool outside the kiln - and it was fine! I even tried this with small samples I have of it's related big brothers 'Super Unobtainium' and 'Silver Unobtainium' and they were fine too! Then typically I made one last night that figured would be fine and it's cracked badly! Ho hum!

One other thing I've been trying again is Jellyfish. Jelly's and mushrooms are two of the first things most boro people seem to make, but I'd never really tried them very much as they always seemed to lack detail. Having seen some different techniques (plus inspired by one of those shock-horror TV documentaries 'Killer Jellyfish Swarms' or some such terror title!) I tried again. I can't get them as deep or large as I'd like, but I'm starting to really like the effects. I even tried putting a couple into a shaving brush handle, which they seemed made for! It's really at the top extreme of size that I can make with my present setup but I think once I can afford to upgrade to a more powerful torch I'll be able to make them more reliable and the jelly's bigger and deeper.

Monday, 26 July 2010

A Shower of Flowers


This has been a manic week! I've been so busy this is the first chance to stop to update my blog for nearly two weeks as I've been making a mad amount of flowers!

Aside from final deadline for a bit of 'day-job' work that I needed to complete last week, I was approached by a Lady in USA who wanted some of my flower bottle stoppers for a wedding shower, to give as gifts to everyone who was attending! That seems such a lovely thing to do, however the date was only a few weeks away, and it meant making 25 stoppers! Plus I needed to make 4 flower pendants as well for some 'younger' guests whom the wine stoppers wouldn't have been appropriate for! EKK!

My main worry wasn't so much making them, the Lady was very flexible in taking them mixed whites to go in with the theme of 'Magnolia.' My big worry was (and always is) once they leave me and go into the hands of the post office! I figured that could easily add a couple of weeks to the deadline which meant I'd have only until the end of the month to get them on their way.

I originally was going to send in two or three batches, so that they could go as soon as ready rather than send them all at the last minute, but I managed to get them done quicker than expected. First job was to get my 'day job' work out of the way, so I went into midnight oil burning mode and did a couple of late nights of number punching. It's odd, I often find I can get more done late at night than during the day. One thing I didn't count on was a sudden heat-wave, which made torching rather 'warm' to say the least!

By Friday I was so close to having them all done I decided I might as well get them all ready and send via express service - as much for my peace of mind - so I would know they'd turn up in time. So Monday morning (today) I finally sent off the box, I nearly passed out when I was told the cost though, it seems peace of mind is rather dear after all!

I didn't manage to get very good photo's, but here are a could of quick snaps of the first 16 I did.

On top of all this I also got confirmation about a very big event that I'll be attending - I will be a tease and tell you more about that in a few days time, so watch this space!

Wednesday, 14 July 2010

Glow in the Dark Adventures continued!


I've been trying to take some photos of some of the pendants I've made with glow in the dark and UV reactive materials, but it seems my camera didn't like it! While I was struggling to get the UV light in position to show maximum 'glow', the auto-focus and light sensors got rather confused and wandered around! I got better results with the 'firework' setting, but the camera then decided fireworks would be a long way away, so everything went blurry! Anyway, here are the pictures!
Before.....


and with the UV! I've tried to keep the effect subtle in this one. that way it doesn't glow during the day and only when it's hit by UV light so the wearer won't look like a glowing neon sign when walking around during the day!


Sory about the duff pictures on this one, the normal one is a bit washed out, but it shows how the pink UV reactive glass changes so dramatically under the blacklight. It's normally clear so I put some white underneath it to help reflect up more light and colour. When the light is more distant to the UV tube it looks much more pink, but my camera has made it look purple!


It's been great fun to play with, and I've been trying to keep the effects subtle so they don't come across like cheap halloween jewellery! I've already listed the first one on Etsy, but I need to find the best way of using the very rare pink one before I use more of that.

Wednesday, 21 April 2010

Volcano Blues


I’ve been putting a lot more into my Etsy shop over the past few weeks, and it’s been great as I’ve been sending little worlds and marbles to USA, Norway, and my furthest yet sale to Australia! My past ‘assaults’ on getting my Etsy shop to work have always fizzled out, so it’s been great getting on a roll again with it. I should have know something would throw a spanner in the works!

Yes, it’s all about ‘that’ volcano with an unpronounceable name in Iceland. With Etsy being such a US based site with international sales I’ve been reluctant to list anything more until I know the Royal Mail is back to normal(ish). I’ve been checking their updates, and it’s still all delayed. Sending to the USA is quite badly effected as they are now sending a lot of recent mail by boat now! Ekk! And a slow boat too!

I’ve been using the time to make another little batch of little worlds. I don’t do these often enough, they are soft glass and it takes me a little while (and failed attempts) to get back into the swing and not blast the glass with mad amounts of heat! These have come out completely different to the last lot, some have got only very light reactions to them, I guess I’ll have to call them ‘Mostly sunny day’ worlds! I’ll need to clean them and pair them up before I can list them, another for my ‘to-do’ list!

I am also concentrating a lot of torch time to glass sculpture. This is quite a departure from the ‘practical’ world of jewellery to make things with ‘no purpose,’ so I was glad to stumble across a quote (I think it was on the Folksy forum) that the purpose was ‘things to make me smile!’ In the course of this I seemed to meander off the very arty project to make some very silly and fun sculptures instead. I hope to have got some special props and more made before I photograph these, so I’m going to keep these under my hat for a bit longer. I suspect they might get me on the front page of Regretsy* though!

In the meantime here’s a snap, courtesy of NOAA public access program, of an older icy scene and what I hope isn’t the type of ship being used for mail to the USA!!!!


*(If you haven’t come across Regretsy yet, it’s one of those snarky blog/websites that point out the odd/funny/disastrous things people list on Etsy. Although most of the stuff is rather ‘suspect’ I personally feel one mans junk is another’s treasure, and at least these people are making something. Not that I want to buy any of it though!)


Photo Credit:US National Oceanic and Atmospheric Administration

Wednesday, 14 April 2010

Nature creeps in


Tiny glass plant
Originally uploaded by steampunkglass
One of the things that attracted us to where we currently live is the closeness to ‘nothing.’ Walk one way and it’s shops, train station, all the stuff you need. Walk the other way for a couple of minutes and it’s fields and hedgerows.

Not that I get to see much of nothing sandwiching my time between early morning train travel and all other spare hours working glass or taking pictures of it, but I think having so much nature around is really soaking into my work lately. I still make glass leaves and small flower marbles as colour tests without thinking of other shapes. The past week I’ve been trying some more outlandish plant ideas, which have been more freeform and quite liberating after the precision needed for marbles. It was my other ‘arf who pointed out how she could easily see which was the first and last, but not due to an increase in quality. Each had become larger, bolder, (and ever slightly crazier!) I’m not showing those yet, as it’s all still ‘work in progress’ – be warned, it’s nothing like more normal stuff

I try to limit my size normally as I have limited torch power, and I’m aware of the cost of the borosilicate colour glass when making larger items. However I think a size increase is inevitable, I look longingly at the USA lampwork magazines where $2000 torches are being use to make full sized bottles and the like. So I’ve been using my ‘Harry Pickup’ mode (as a previous post) and making smaller and smaller objects. One of which is a new sculpture of a plant with flowers in a pot, which is about 30-40mm high. I couldn’t even melt the punty off the bottom on this one, I was worried the heat would make the make the top melt and ball up! Not the sort of marble I want! In the end I ground off the glass rod when it was cold. I’m going to pop that in my esty shop later this week.

Back to nature, I was lucky to see an amazing sight back in the cold days of February on my morning walk to the train. I go over a small river which has a flood plane left populated by weeds, rabbits, dragonflies and more. There was a sudden commotion in the frosty distance and a baby and adult rabbit making sounds rabbits shouldn’t make! A stoat was trying to pick off the baby (he/she failed) and it was amazing to then see the strange, almost serpentine, way the stoat moved though the think undergrowth. I knew there were stoats locally but had never seen one before, and felt a bit spoiled to see one actually hunting too in real life rather than on a TV documentary. Not great for the rabbits, but an amazing site on a cold morning, and worth missing a train to stop to watch for a few minutes!

Wednesday, 7 April 2010

Random Notes of Tea Breaks


Despite deciding not to list so much on Etsy, that’s exactly what I’ve gone and done! Within the space of a few days I’ve pretty much doubled the amount of listings there, plus tweaked the prices on a few where exchange rates have changed, or old things I’m fed up of looking at!

I’ve also listed some of the new pendants I’ve been making, which I am really rather pleased how they are now coming out. I’ve cut down the failure rate, but I am taking a lot more time over them now. Originally I planned to add chains or nice leather cord with silver findings but they took ages to turn up, so I’ve listed them now as an ‘optional extra’ as I know some people just want the pendants to add to their own necklaces. Somewhere I’ve got a stiff silver choker, I am sure one would look great on that, but the grand tidy-up scheme seems to be taking a lot longer than planned! I was going to do blitz listings of old bits and bobs, but it seems to take ages to get everything photographed, and I so easily get distracted by ideas to try. I found a white marble when sorting through that I saved as it gave me a brilliant idea – I just need to remember what it was!
You can find my Etsy shop at http://www.etsy.com/shop/steampunkglass

In aid of my memory I’ve got back into the habit of carrying a little notebook and a nice pen to scribble away in. I seem to be filling it up nicely. I normally jot notes on backs of envelopes, but my other half got me a selection of little books which are really nice to use as well as keep all these ideas together. I am not sure how useful any of it is, but it’s a nice way to turn ideas over in my mind with a cup of tea and a slice of cake! I seem to have developed a rather odd habit lately of really fancying cake when I’m having a session on the torch. I’ve given in and started buying a Victoria jam sponge especially for those long weekend sessions! Not doing my waistline much good, but with a cup of Lady Grey it makes very civilized tea breaks! Here’s a page out of my mad tea ramblings, I’ve picked one of the clearer and less messy pages!